Looking for something?

Showing posts with label Historical Sew Monthly. Show all posts

Thursday, 29 June 2017

Gala Gown 2017

As I planned out my sewing for Costume College this year I had to rethink all my plans. I had planned a huge project that involved a fully beaded 1912 gown. Between school and now my internship, it wasn't going to happen. Maybe next year.

I settled on this floofy number:

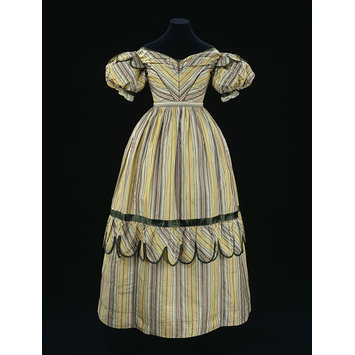
1828 Dress, Victoria and Albert Museum
I've never been interested in the 1820s to 30s look.  But something about this dress took me in.  The more I read about it and discovered it was likely made from 18th century fabric, the more I fell in love. Plus, it's a fairly simple design. With the right fabric it could be a fancy frock.  And those bias scallops! Yum!

Finding fabric was the tricky part. I wanted an 18th century-esque stripe that was ideally green and purple. Alas, no such fabric could be procured. I was lucky enough to hit up the LA garment district on reading week and found some green and gold stripe that suits perfectly. You'll have to wait and see the final dress ;)

I got my corded petticoat done just in time to leave for CW.  Literally.  Just in time.  Like 3 hours before I left my house. Ugh.  I already hate it and wish I could remake it, but whatever. I hope it does the job. 

I brought all my sewing supplies with me and am slowing moving through the process. At first I was concerned about hand sewing the entire thing because it was going to take forever.  And I remembered, I'm here to hand sew everything... so yeah, that works out well. *face palm* 

I've cut all the pieces and am carefully hoarding them in my room.  The only part I'm not doing by hand is the making the piping.  I visited a friend with a zipper foot this week so it's all ready to go! Now I just need to get sewing. The dress itself should be fairly straightforward. As you see all the front panels are at an angle and match stripes.  By hand is definitely the way to go! 
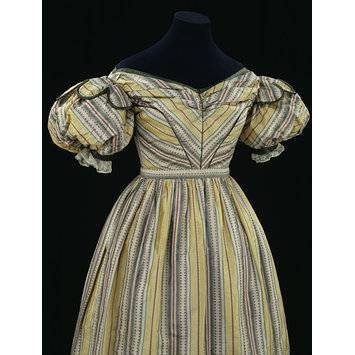
All the bias!

The last piece I need to figure out it is the sleeve supports. I'm using silk taffeta that will need a little help staying afloat. I'll be following this tutorial from Fresh Frippery as a simple way to add a little floof. I love the idea of using tulle so they stay light and fluffy.

I also need to make a hair piece.  I'm terrible when it comes to doing my own hair. I've got a good grasp on regency, so I'll use that knowledge to make this work.  I'm planning to do something like this: 

1828 Abendfrisur

I bought all the necessary pieces with me and will attempt to make something passable while I'm here. I may invest in a foam head as that will be easier to hold things in place.  Fingers crossed!


Hopefully it'll be done before I go! I'm looking forward to hand sewing a gown. I'm feeling more confident in my hand sewing skills so this is a perfect opportunity to show them off!

And thankfully it'll fit perfectly in the July challenge for the Historical Sew Monthly.  I'll complete at least one challenge this year. ;)

Cheers,
~M


Tuesday, 8 November 2016

1805 Summer Bonnet

Oh my heavens!  I completely forgot to tell you all about my summer bonnet.  Let me do so now.

After last summer's Promenade I wanted a light, airy bonnet for the inconsistent summer here in Alberta.  June could snow, rain, or scorch us, or quite possibly all three!  July is usually quite warm.  August could be the same as June, though typically in the reverse order.  (I promise I don't jest!  It snowed the day after our end of August wedding)

I discovered this lovely bonnet by FestiveAttyre:

http://www.festiveattyre.com/2010/07/building-straw-braid-bonnet.html?m=1

The unlined straw is exactly what I'd been looking for!  While in LA I discovered California Millinery, which has an entire section of straw braids of every shape and colour.  I came home with three different kinds, one being a navy blue that would suit my outfit nicely.

Festive Attyre's blog was the only useful source I could find regarding where to start.  I tried a few Facebook groups, but they all suggested a buckram base, which I was hoping to avoid.  As usual, I just decided to give it a go and hope for the best.

I made my frame out of bristol board, did a quick check for fit and shape, and then started pinning my straw.  As I only had a short length I decided to start with the brim and work backwards.  I was hoping for a longer bonnet, but buying materials in a foreign place with a long line behind you makes it nearly impossible to think straight.

I quickly spritzed my straw with water before starting to pin it to the base.  It did nothing to help and I was so frustrated I nearly gave up on the whole thing.  I remembered reading something somewhere about soaking straw to get it to behave, but only for a short time.  I soaked my straw for 25 seconds in tepid water until the dye started to leak out and I panicked and pulled it out.  I let it sit in a strainer for a few minutes before starting.


You'll notice I wrapped my base in plastic wrap so it didn't get too wet.


From there I just started pinning.  And pinning.  And pinning.


The dye didn't fade at all to the naked eye, but my hands were purple-ish blue for a week!

I decided to pin the entire thing before sewing as I thought for sure I'd make a mess of it.  By the time I finished pinning the crown the brim was dry enough to start sewing.  I used a sturdy thread and just started stitching, removing the pins and I went.


I wanted the brim flipped under at the back so I basically just made a bucket hat.  It was a rather boring shape until I flipped the back, close pinned it in place, and let it dry again before stitching it down.

While waiting for it to dry we went to Chintz and Co.  It's one of our favourite stores, though we mostly spend time at the back in the fabric section.  It's the only place in Edmonton you can get really nice quality silks and velvets.  They are mostly a home decor store and so have excellent quality petersham and faux flowers.  I was able to grab a few items to match my bonnet, and then finish that same evening.

Ta da!


My very, very late HSM entry:
What the item is: Regency Summer Bonnet
The Challenge: #6 Travel
Fabric/Materials: Straw braid, faux flowers, feathers, 
Pattern: My own
Year: 1805
Notions: thread, ribbon
How historically accurate is it? Very.  Based on a fashion plate from 1805 and entirely hand-made
Hours to complete: Oi.  About 16-20
First worn: August 21st, 2016
Total cost: $40 CAD


A bonnet fit for a good frolic!


Thursday, 4 August 2016

1770s Robe a la Francaise

I'm just back from Costume College so I hardly know what to write!  I'll write a post about that soon.  You know, once my luggage arrives home...

My 1770s gown started as it so often does; it all started with a gorgeous striped silk I picked up for $11!  I've had it in my stash for over a year knowing it would become a Francaise one day.


I already had the stays so I just had to make panniers.  I followed The Dreamstress' pannier along tutorial.  I highly recommend it!  The only adjustment I made was that I decided not to put a bottom in my panniers.  Stupid, stupid idea.  Ignore me and follow the directions!

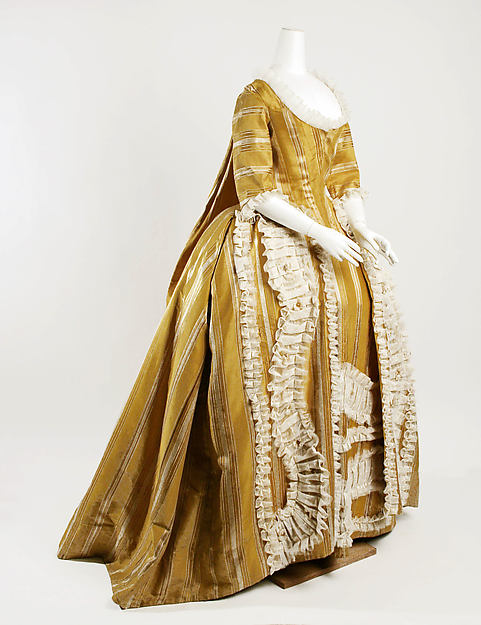
It started as a 1760s gown with this delightful number from the MET as inspiration:

MET, 1750-1775 European gown, silk
I used Katherine Caron-Greig's tutorial on making a Francaise gown.  I found it quite easy to follow.  Check out the nine part series here: http://koshka-the-cat.blogspot.ca/2011/03/draping-sort-of-sacque-part-one.html

I started with the back in order to make sure I had enough fabric.  Matching the stripes was the only tricky part.  


Once I had the pleats in I could add the side panels and start pleating in the skirts.  Once I knew how much fabric I needed for the back I could cut the petticoat.  Then, came the trim...


This was quite the trial and error! I did my best to replicate the trim in my inspiration photo, but honestly I was just winging it!  I cheated and machine sewed the trim on the petticoat.  Not ideal, but I was running short on time.  The straight line was a little finicky, but doable.  The wavy part was completely crazy!  I made a guide and just started pinning.


But it worked:

Knowing the amount of trim I had to do on the gown I was feeling a little apprehensive.  With a little advice from various sources I just dove right in the to the rest.  I finished the rest of the gown.  I'm especially proud of the back robings :)


Now, this is where things got tricky.  I found a delightful little ship for my hair.  A SHIP.  FOR MY HAIR!  I wasn't willing to sacrifice the ship so I had to adjust the gown.  Ships in hair were worn specifically to celebrate a naval battle fought and won against the British by the French in 1778.  I had planned to create a stomacher for my gown, but that was WAY too early and wouldn't hit that middle ground I was aiming for.  Then I came across a compere front gown.  


It's a perfect blend of styles.  It's a sewn in stomacher with functioning buttons.  How clever!  It also makes it easier to get in and out of.


I draped it like a normal stomacher and then just marked the centre, added my seam allowance, and away I go!  

After sewing on MILES and MILES (I just got back from the US!) of trim, here's the final dress:


I'm so proud of it!  

The Challenge: #8 Pattern
Material: Silk stripe and trim, cotton lining
Pattern: Draped based on Katherine Caron-Grieg's Sacque tutorial
Year: 1770s
Notions: silk and cotton thread, covered buttons, ribbon for bows
Accuracy:  I'm going to give myself about an 80% on this one. Materials and pattern are spot on.  I did cheat and use modern techniques for the sleeves, and a button cover kit, but it's almost entirely hand sewn.
Hours:  Oh boy.  I have no idea.  If it weren't for very dear friends helping me sew this it would have been impossible!
First worn: July 30th, Costume College Gala
Total Cost: $25.  No, that's not a typo :)

Special shout out to Jenny La Fleur for the AMAZING hairstyle.  The ship and flowers were absolutely perfect!  And jewellry by Dames a la Mode!

Special, special shout out to some very lovely ladies for helping me pleat all this trim and hand sew it on!  Without their love and support this gown would be me in a puddle of silk, crying.  Ladies, you are truly amazing friends!

~M

Friday, 25 March 2016

1806 Soutache Gown

I'm pleased to say that I finished my elaborate soutache gown in time for the ball!

To recap:  I've been dreaming of this lovely portrait for ages.  It's elaborate and subtle at the same time.  The folds of the sleeves have me captivated.

1806, Hortense de Beauharnais with her son Napoleon Charles by Fraincois-Pascal-Simon Gerard
I'm not a particular fan of white dresses so I opted to use some lavender satin from my stash instead. I substituted the gold trim for a white soutache (have I mentioned I LOVE soutache...?).

I started with Laughing Moon #126 as my base dress.  It fits me perfectly so I didn't need to do another fitting.  Or so I thought...

Figuring out the exact pattern of the skirt panels took longer than I'd like to admit.  It's four separate pieces sewn in a zigzag to make the criss-cross pattern.  Since I used my machine to sew it it didn't take long at all.  I started the project early thinking I would have to hand sew it, but once I figured out how to do it by machine it zipped along quite well!

Marking out the intersections with dots.

The sleeves were a bit of a puzzle.  Since I can't see the back I just sort of guessed how they were pleated.  I have to say, I truly love the affect of pleated sleeves.  I interlined them with cotton so give them a bit of body and did three panels of soutache.  It's the same pattern as the skirt, but in a smaller scale.  Again, figuring that out took longer than I'd like to admit!  I also had to angle the outside lines of trim so they'd look straight once pleated.  Man, am I glad I thought of that before sewing!

Skinnier version of the skirt detail.

The delicate sheer trim along the neckline didn't entirely turn out the way I'd like, but it'll do.  Mine didn't stick up the way I'd hoped :\

The bodice front was easy; I sewed a 3/8" piece of folded silk organza into the top edge of the bodice.  Easy peasy.  This had to be done before the trim along the top as it was too close to the seam allowance to do afterwards.

I had quite the time fitting the bodice!  I've never made the fitted version before so it was a bit of trial and error to get it to sit properly around my stays.  I have a large cup size and small band size so I often need an arm scythe dart.  I don't believe it's period appropriate, but that's what I had to do here.  See the GIANT side dart?
The neckline was WAY too high so I lowered it about an inch.  Felt like I was wearing a Regency turtle neck!

The rest of the neckline trim is just a tube of silk organza held in place by loops of ribbon.  Again, I'd like it to have a little height, but it was done the night before the ball and I was done with this dress-puzzle.

Making things up as I go!


Have you ever made a tassel?  They are quite therapeutic.  I made sure mine hung down a little to avoid a pasty look.


What the item is: 1806 Regency Gown

The Challenge: #2 Pleats and Tucks

Fabric/Materials: Poly satin, cotton/rayon soutache, cotton interlining, silk organiza

Pattern: Laughing Moon #126

Year: 1806

Notions: So. Much. Soutache. 24 yards, in fact!

How historically accurate is it? I'd say 50%-ish.  Mostly synthetic materials and I machine stitched it, but the overall look is quite close to the portrait.

Hours to complete: About 20-25.

First worn: February 27th, 2016

Total cost: $30.  I only had to buy the soutache and some thread.


Up Next:
Paniers!

P.S.  Look what I found!  It's a crochet turtle measuring tape.  Much delight was had by all at work the day I brought this friend to say hello.  He's even featured in a movie!


Sunday, 31 January 2016

Stays, More Stays, and a Chemise

Remember how I lost my blue stays?  Yeah, me too.  I made a replacement pair, but I was never really happy with them.  I decided to dive in and make the Laughing Moon corded stays #115.

The pattern is quite simple.  Sewing a bazillion (!) channels is tedious, but so worth in in the end.  I traced my pattern using a fancy iron-erasable pen and then sewed and sewed and sewed.  I've had a roll of butcher's twine kicking around that was perfectly suited to the project.


Because the channels intersect, you need to sew them in a particular order.  You sew a few, thread them with twine, then sew a few more.  Since I love puzzles I really enjoyed the challenge.

Behold!  Stays!


What the item is: Regency Corded Corset
Challenge: Procrastination
Fabric: Cotton exterior and interlining, linen lining
Pattern: Laughing Moon 115
Year: 1805-1840
Notions: Cotton butcher's twine, cable ties, cotton bias tape, ribbon, lacing
Accuracy: 70% - all machine sewn, and I used plastic for the boning, but great pattern and appropriate materials

Just as I finished cording my new corset, B found my blue stays tucked in a random garment bag.  No idea how they stayed hidden for so long, but it means I now have two sets of stays.  Woo!

And of course what Regency lady would be complete without a chemise.  I've been meaning to make one forever and just never put the time in.  When I found the most luxurious cotton rayon blend.  It's a bitch to sew and press, but so comfy under my stays!


What the item is: Regency Chemise
Challenge: Procrastination
Fabric: Cotton rayon blend
Pattern: Laughing Moon 115
Year: 1805-1840
Notions: Bias tape and ribbon
Accuracy: 70%

~M 

Saturday, 26 December 2015

A Christmas Spencer

All I want for Christmas is a Spencer.  Wait, that's not right...


I finally finished my Spencer!  I'm so happy with the way it turned out.  I spent many hours hand sewing the trim, but it was worth it.


It doesn't look like much from the front, especially on a mannequin that isn't the right shape.  I really love the deep V-neck.  It shows off the top of my gown quite nicely.  Eventually I'll add trim to the cuffs, but as usual I needed this for an event so something had to give. 

Don't you just love the love the points on the collar corners?  
It all started from this fashion plate.  Except I hate pink.  But the detail!  So delicious!  My apologies for not noting the source.  It was uploaded to Pinterest without any references.  If anyone knows the source please comment and let me know!  I assume Ackerman's.

I've never used soutache before.  I basically made it as I went along.  I started by marking out the pattern I wanted: 


Then I realized I didn't need quite so much chalk...


From there, I just hand stiched it down.  And voila!  A collar!


I think I want soutache on everything.

The back was a bit trickier.  Looking at the fashion plate I realized that they placed designs under the arm.  Knowing I was short on time I wasn't particularly interested in decorating my arm pits.  I stuck with the basics and really, no one noticed I didn't have fancy arm pits.  


The back seam pattern was easy.  I just had to remember to start at the stop and work my way down.  I wanted to make sure it was cross-crossed evenly.  I wasn't happy with the way I originally marked the centre piece.  I seemed to get lost in the seam decor.  I lengthened the design a bit and ended up with this: 


A little Regency punk, no?

For those who know me, "badass" isn't among my oft described characteristics.  At this point it looked a little biker chic.  I wasn't planning on adding the ruffle noted in the pattern, but I felt obligated now just to soften the line a bit.

Behold!  A Spencer!


The details:

Regency Spencer
Challenge #12: ReDo
Redoing challenge: #9 Brown
Fabric: Wool
Pattern: Laughing Moon #129
Year: 1799-1809
Notions: Burgundy soutache
Accuracy: 70%?  I did use poly lining because silk is so hard to get here I'll be damned if I waste it on lining!
Hours: 15
First Worn: Dec 13th for a Regency hymn service and tea
Cost: $45 CAD